Art Prompt: Collage

COLLAGE ~ this month we are going to dive into one of my favorite art processes, COLLAGE! Collage is an art technique where we combine painted papers, clippings, photos, recycled papers, or small objects onto a surface to create a one of a kind piece of artwork. We think about how we combine colors, textures, and materials to add visual appeal to our piece. We can work flat or we go work three-dimensionally depending on what we want to create. For me, it’s all about enjoying the PROCESS of selecting and combining materials.

 Three prompts to getting you collaging this month:

“Explore Children’s Books featuring Collage”

“Collage Buffet”

“Card Making with Collage”


“Explore Children’s Books featuring Collage” – warm up to the idea of collaging by admiring collages in children’s books. Take some time in your classroom (or personal book collection) to gather up some children’s books that feature collage. Pour yourself a cup of hot tea and spend time noticing the layers, admiring the layout, and savoring the colors that the artist used to create the collages in their books. You might notice details that you never noticed before, despite the fact that you have read that book a gazillion times. My favorite collage artist is Eric Carle and revisiting his books is a favorite way for me to get inspired. Eric Carle’s process begins with making beautiful painted papers in different colors, adding details like patterns and polka dots, and scratching into the paint to give different textured effects. He would keep his different colors and textures in different bins and use those for creating is amazing works of art. (To learn more about his process you can find videos of him on YouTube creating his works of art -or- treat yourself and visit his museum in Massachusetts.)

I also adore Lois Ehlert, especially her nature collages and loose parts in her books Leaf Man and Snowballs! We will do “Land Art” or “Nature Collage” as one of our prompts this summer!

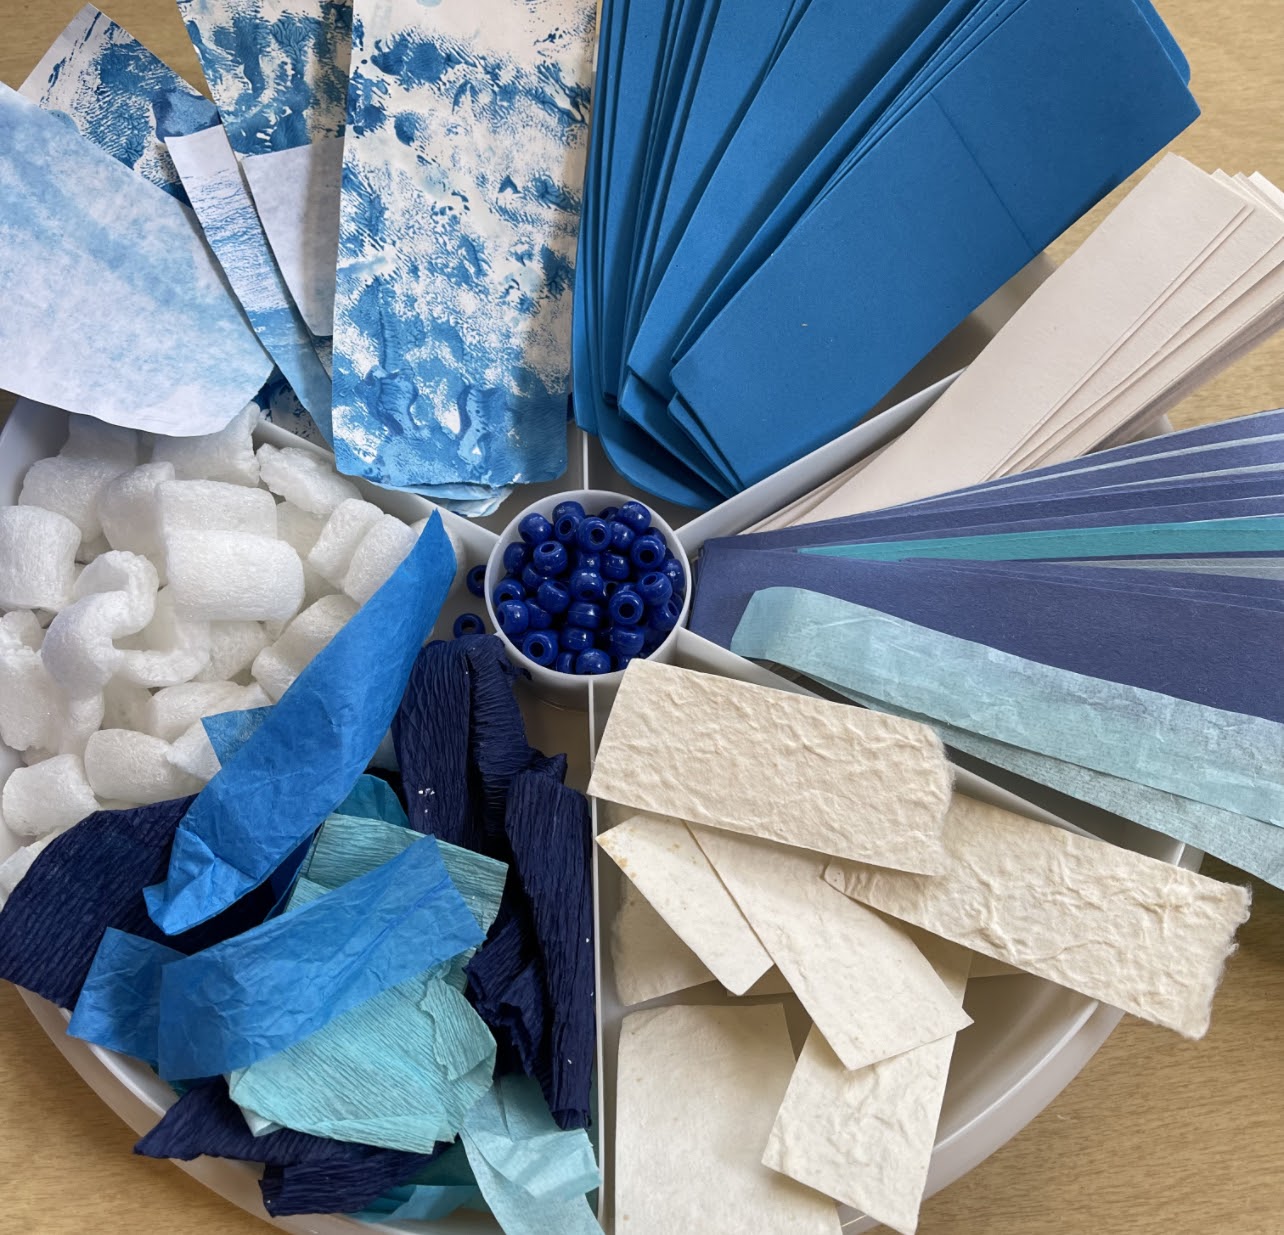
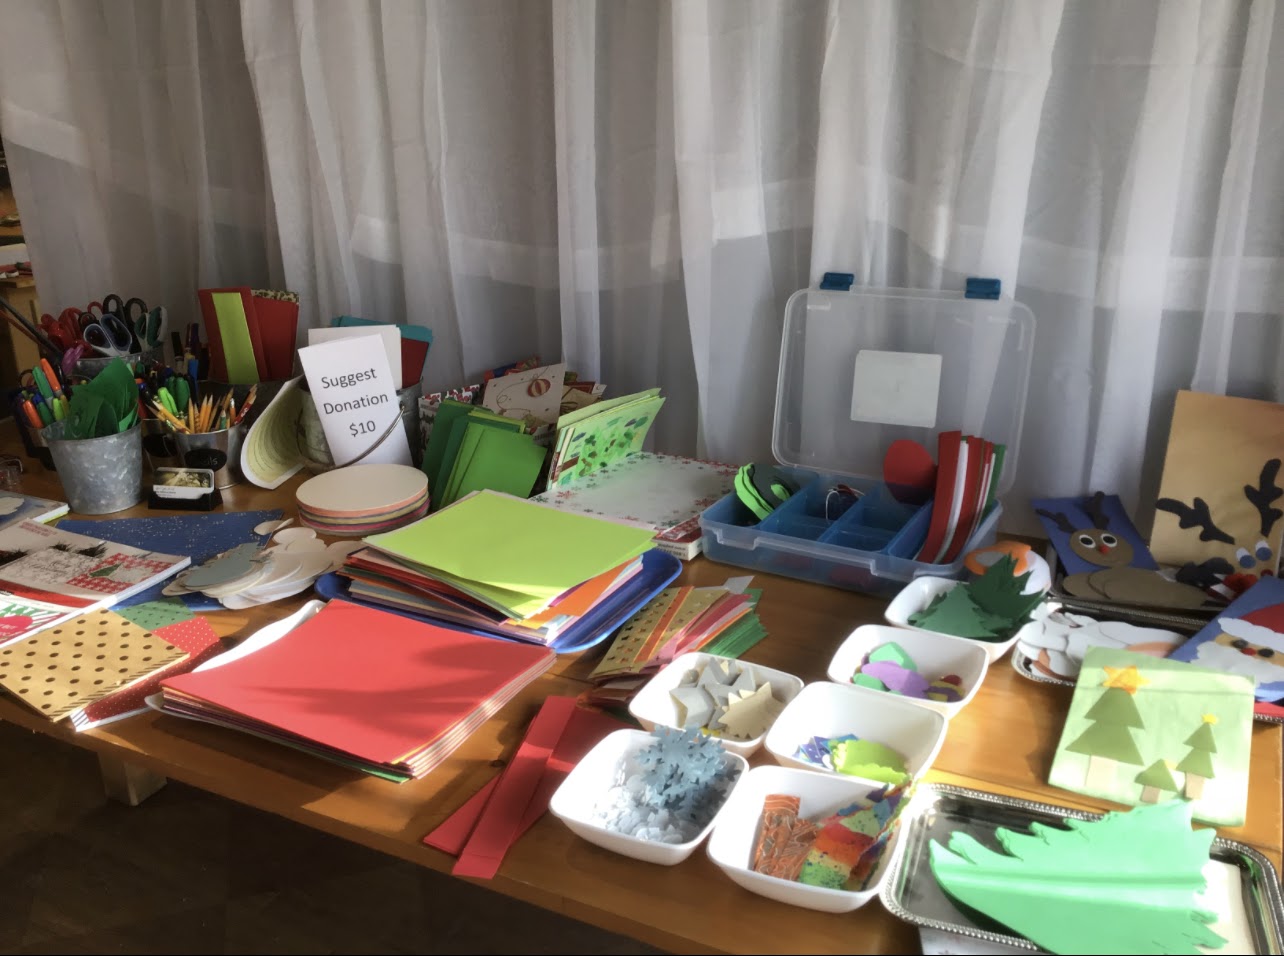
Collage Buffet” – Even before making a collage, take a bit of time to set up a “Collage Buffet” for yourself by putting a variety of complementary colors together with a variety of different materials. In each partition of the chip and dip container put a new material and keep filling up the container until you have a well rounded selection of materials. Admire your collection and think about creations that you might make. For me, I enjoy the gathering process and often do that part the day before collaging. Then on the day I am going to collage, I appreciate being able to sit down with a variety of materials to dive into my creativity.

Card Making with Collage ” – receiving a handmade card is such a wonderful feeling. Think of someone you love that you know would appreciate a homemade card. Think about colors, images, or art materials that come to mind when you picture that person. Perhaps print out a special photo of you and that special person to add to the card. Sit down and create a card for them. Don’t allow perfection to stop you, and even if you think it looks too childlike, send or deliver the card to them. I promise…heartfelt cards are treasured for years to come. I have some ideas in a blog post about setting up a card making station that might inspire you to bring this into your classroom as well!

Last month we explored, “Art Prompt: Painted Papers”. Did you make a bunch of papers and wonder what to do with them all?! Here is my portable go to way to sort and store my stash of painted paper and scraps for collaging. It’s easy to keep organized and helps me to control how much paper that I keep.
(Full disclosure ~ hoarding painted papers is a weakness. I have two of these boxes ~ one at home and one at school because you never know when the urge to create with hit!)

I’d love to hear who your favorite collage artists are! I’d also love to see your process and collages this months too! Send me an email or tag me on social!

With gratitude,

April

FB Page: “April’s Teaching Tree”

Instagram: @aprils_teaching_tree

Link in bio page: https://aprilsteachingtree.mykajabi.com/links


Printmaking Tools for Open Ended Process Art

Oh the joy of printmaking with children! Here is a lovely wintery scene we made recently in my preschool classroom!

Printmaking is one of my favorite process art invitations. I love gathering a variety of interesting materials to offer to my students to have them explore the process of printmaking. What I love is that ALL my students can find joy in the process and often express how much fun they have when making prints. 

A new favorite tool that I found on Discount School Supply are these “Colorations Fingers and Hands Stampers” (set of 12)

I reached out to some other process loving educators to brainstorm a list of materials to explore. And because nothing is quite as satisfying as making a handy ABC order list to share with my GROWN UP students in my workshops and courses…I did just that this week! 

{Drumroll please} Here is your very own access to the “ABCs of Printmaking Materials”. Hit reply and tell me what I missed…what is a material you love to use in printmaking that I left off the list! I’d love to hear about your process for doing printmaking with children! Or do you dabble in the FUN of printmaking yourself?!

ABC List of Printmaking Materials

  • Alphabet magnets 
  • Balloons – inflate and dip in paint to make interesting paint circles, push different amounts to vary the size of the circles (make a snowman?)
  • Bottle caps & milk jug lids
  • Brayer roller – (ink roller) the hard rubber kind, if buying new get the 4in and 2.2 in – these are great for ink for older kids/adults, or experiment with liquid watercolors!
  • Bubble wrap (makes great prints that look like snowballs falling from the sky)
  • Burlap pieces ~ different weaves and textures; after the print making, perhaps chop up the painted burlap as a collage material?
  • Cardboard cut into geometric shapes
  • Cardboard tube – thick ones from Cricut vinyl rolls are really durable
  • Clothespins with pieces of sponge (geometric shapes); extra clothespins as some kids like to attach things so their fingers stay paint free 
  • Cookie cutters
  • Corrugated cardboard edges
  • Cotton balls; 
  • Cotton rounds in 3 different sizes
  • “Colorations Fingers and Hands Stampers” (set of 12) – see last pic in blog post, these are from Discount School Supply
  • Dice
  • Egg cartons – cut up into different shapes
  • Fruit basket / berry baskets from the market – cut apart to make a snowflake shape
  • G
  • Hair combs – different widths and tooth sizes 
  • Hair rollers – different textures
  • I
  • Juice lids – like frozen OJ lids that are metal 
  • Kitchen tools – potato masher, small sieve, scrapers, spatulas 
  • Lace scraps
  • Legos or Duplos 
  • Liners from candy boxes – different textures. Create a negative space print. (great excuse to buy and eat candy, too!)
  • Mason jar rings 
  • Mesh bags that onions & oranges come in ~ snakeskin or mermaid effect
  • Natural loose parts – from your stash: seashells, 
  • Organic plant material from your aread – go for a winter walk and gather: leaves, sticks, lichen, bark, pine leaf clusters, pinecones 
  • Packing peanuts 
  • Plastic woodland animals (or dinos) – make tracks in the snow!
  • Pencil – use eraser end
  • Q-tips 
  • Ribbon spools – empty circles that thin or thick ribbon comes on are great for printing larger circles as little hands can hold on to them!
  • Shoes – children’s shoes can make great prints, like walking in the snow or mud using paint
  • Soup cans with label off & ends cut off with a tool that makes them not sharp
  • Spatula blades – cut different textures into them for printmaking – inspired by Princeton Catalyst blades https://www.dickblick.com/products/princeton-catalyst-blades-mini-blades/
  • Sponges with different textures 
  • Styrofoam trays – cut into different shapes / use a chopstick to etch in designs to print (use a Brayer with liquid watercolor for finer detail)
  • Thread spools – look for ones with different designs, narrow spools
  • Tubes – especially those thick ones from vinyl from Cricut machines
  • Toy cars or trucks – tracks with paint 
  • U
  • Valentine chocolate boxes ~ add a bunch of heart shaped tools: heart cookie cutters
  • Wine corks – different sizes
    X
  • Yarn – string painting – dip in string and splat or print onto paper
  • Yarn wrapped block – dip in paint and press onto paper, turn block different ways for different effects. 
  • Z
Featured

Art Prompt Project 2023

{drumroll please} I am so excited to invite you to join me for my virtual ART PROMPT Project 2023 

I believe that as WE explore different art materials, mediums, textures, sensory materials, loose parts and art processes our connection with our own personal art practices are fortified and our playful sides are ignited! 

Maybe your last art class was way back in middle school, or maybe you haven’t picked up a paint brush in decades. Or maybe you are already doing art pretty regularly but are always up for new ideas. My ART PROMPT Project 2023 series is for ANYONE who wants a little nudge to explore their creativity...no art experience is necessary.

I believe that we can move past perfection, and remember that our purpose in making art is to find our JOY!

When we carve out time for our OWN creativity, we awaken and remember the simple joy of creating. Experiencing “process art” (not worrying about outcome) will you feel FREE in other areas of your life.  

ART PROMPT Project 2023  will be sent at the beginning of each month. If you are already on my email list the prompt will be delivered to your inbox. The first one will go out Thursday, Jan. 12th, 2023 where we will be exploring Painted Papers!  

The subject line will start with Art Prompt:  so look in your inbox for an email from  April’s Teaching Tree with the subject line = Art Prompt:  I know inboxes get full but it will be fun to be part of this YEARLONG journey! Several people have already responded and said they were excited to have a monthly nudge to remind them to make art! 

If this project sounds exciting…I’d love to hear what art materials you hope we explore in our monthly prompts. Do you already have a personal art practice? What holds you back? ~ HIT REPLY and tell me!

Not on the April’s Teaching Tree email list? Send me an email or DM me your Name and Email and I will add you!

“I’ve seen women insist on cleaning everything in the house before they could sit down to write… and you know it’s a funny thing about house cleaning… it never comes to an end. Perfect way to stop a woman. A woman must be careful to not allow over-responsibility (or over-respectability) to steal her necessary creative rests, riffs, and raptures. She simply must put her foot down and say no to half of what she believes she “should” be doing. Art is not meant to be created in stolen moments only.” ― Clarissa Pinkola Estés, Women Who Run with Wolves

With gratitude, 

April 

Pinecone People

“Pinecone People” – Today I made “Pinecone People” with a group of 20 preschoolers out in the forest. I wasn’t sure how the natural materials would stick because everything was wet from two days of rain. I sort of cheated and pre-glue beads to the pinecones so there would be some level of success, even if the other bits were falling off, at least the heads would stay on! I also had some plain pinecones so children could create whatever they wanted.

Pinecones are challenging in that they tend not to stand up on their own and have very little flat area to glue onto. So this led to exploring the following ‘adhesive materials’ and I share some thoughts on how it went.

The next picture shows the art materials I gathered that I thought might be useful to adhere natural materials to the pinecones. I wasn’t sure how these would work but I wanted to have a variety of options to test out. (If I was making these indoors I would have used my trusty low-temp glue gun since it makes things stick even if the surface isn’t flat.) But that’s a challenge of being outdoors is figuring out how to make it work even in damp weather! Listed below are some thoughts on these materials!

Liquitex Acrylic Medium – I read about this in Sally Haughey’s book, “Wonder Art”, and thought I would give it a try. It’s much more expensive than glue but so worth the investment. A little bit goes a long way and it seemed to work well with a wide variety of textures. Obviously the drier the material the easier things seemed to stick, but even with some damp materials it all stuck really well. So I would definitely suggest adding this to your teacher art supply kit. I used a popsicle stick to get a little out at a time and kept it in a little scoop so I could keep track of it.

Glue dots sort of worked especially if stuffed into the pinecone. If the materials were lightweight and dry, they seemed to hold fairly well. Today with the damp though, wet materials did not stick well.

White glue was all but useless since pinecones have very little flat surfaces and take way too long to dry. This was frustrating for some kids and though they can be independent with the glue it really didn’t work well.

Twine & yarn was woven into the pinecone independently as decoration and with adult support the yarn was used to tie the leaves on like a belt or scarf.

Fuzzy sticks (pipe cleaners) ended up being a great tool. Many preschoolers could independently twist them onto the pinecone and have their people holding acorn babies or used to hold on their wings.

Air Dry Clay was not really great to get the materials to stick together but some enjoyed squishing materials into the clay and squishing small bits into the pinecones.

Wool roving wasn’t in my materials bag today but in hindsight I could see the kids enjoying weaving it into the pinecone, creating hair, or making arms with it.

Moss also wasn’t in my materials bag today but would have been fun to add for hair or decorations.

Milkweed Pods all the little pinecones became ‘babies’ and I was wishing I had some little pods to use as cradles!

A related discovery was that using washable markers on wooden beads led to smears and bleeding. I discovered that the wooden beads and colored pencils worked well though the color was light. I was tempted to use a permanent marker but knew that many other aspects of the projects needed adult support.

Have you ever made “Pinecone People”? Any tips or tricks that you discovered?!

“Spacecraft Design 101″

“Spacecraft Design 101”

at the Davies Memorial Library in Waterford, Vermont 

July 19, 2019 ~ 9:30 -11:30 a.m.


Every young astronaut dreams of designing & creating their own cardboard space travel machine. April Zajko will lead this hand-on workshop where every child will be encourage to let their creativity shine. Afterwards participants will be ready to blast off home with their own rocket or spaceship.

Kindly pre-register by calling the library (802- 748-4609) so we will have enough materials on hand!

Though April has not traveled to space herself, she has inspired children for almost two decades to reach for the stars! As a licensed Early Childhood Educator, she believes that children (of all ages) learn through play and that the universe of knowledge and joy awaits children in the books they read!


Pop Up Art Studio ~ December 18

Local Teaching Artist, April Zajko, will be offering a series of “Pop Up Art Studio” sessions in the Northeast Kingdom of Vermont. These open studio sessions are for everyone! Pop Up Art Studio is a welcoming space, that creates opportunities for dialogue, skill sharing, and art making between people of differing backgrounds, ages, cultures and abilities. If you would like to host a Pop Up Art session at your business, organization, or circle of friends please contact April at aprilzajko@gmail.com

April’s unique perspective as an early childhood educator makes participants of ALL ages and artistic abilities feel welcomed and at ease. With a focus on enjoying the process of art making, participants can feel the gentle transformative power of creating art in a cozy and encouraging space where ALL are welcome.

The December 18th session will focus on card making with mixed media & paper collage. Participants are invited to drop in for an hour (or several hours) to sip tea, chat, and create unique paper collages. Bring a friend or family member or come meet new friends in your community.

POP UP ART STUDIO ~ Card Making

December 18th

12:00-8:00PM

Location: 142 Eastern ~ St. Johnsbury, Vermont

$10 suggested donation per person

No one turned away for lack of funds

All ages (Children 8 and under must attend with a responsible adult)


Live Music from 5-8 p.m. with “BOBBY FARLICE SOUND SYSTEM”

With a long history of music in Los Angeles and the San Francisco Bay area, Bobby Farlice was a member of Nobuko Miyamoto’s band Warriors of the Rainbow and the Change Band with Flip Nunez and Michael Howell. He was also a contributor to music for the progressive social scene at San Francisco’s Glide Memorial Church. His set is jazz, blues and Latin, all with a touch of soul, and all for your listening pleasure. Having played the nightclub scene for many years, he prefers playing community gigs like First Night, which he generously supports. The sound system in the Bobby Farlice Sound System is his Roland FP2  keyboard with Session Partner, which turns Bobby into a one-man band.

Art Series: Gifts from the Heart

Art Workshop Series: “Gifts from the Heart”  ~ for children ages 5-8

art materials close up color pencil colors
Photo by Pixabay on Pexels.com

This children’s art series is designed for ages 5-8. The classes will give children the space to explore a variety of art materials and the opportunity to create four unique homemade gifts. Projects will include: jiggle-scribble bots, keepsake painted canvas, eco-sculptures, and paper collage. Children can choose to wrap their projects so they can be given as gifts from the heart to their loved ones.

Where: Catamount Arts Center Classroom in Saint Johnsbury 
When: Wednesday, December 5, 9:30 am – 11:00 am

Fridays, December 7 – December 21, 9:30-11:00 am

Instructor: April Zajko, M.Ed.

Class fee: $60. Catamount Arts is committed to offering quality arts activities for children, regardless of ability to pay. Please call 802-748-2600 ext 108 and speak to Anne to inquire about scholarship availability or working out a payment
plan.

Registration Deadline: November 30

To register, head over to the Catamount Arts website:

http://www.catamountarts.org/shows/details/gifts-from-the-heart-ages-5-8